How to Take a Video in Your Browser
Ever wondered how to take a video in your browser? There are some instances where this is required. Such as reporting website bugs to your developer or sharing updates or online tutorials. You may have already explored our post guiding you on the process of taking website screenshots. Recording video casts from your browser follows a similar process, while utilising the browser ad-on Nimbus Capture. Allowing you to capture up to 5 minutes of video content for any single video from within your web browser as part of the free option. Or for longer videos you can upgrade to the paid option.
How to Take a Video in Your Browser Using Nimbus Capture
1. The first step to capturing video in your browser begins by installing the Nimbus Capture chrome extension. From here you’ll be able to benefit from all of the features. Including capturing screenshots and video screencasts within your browser. As well as the ability to upload and share this content with others and annotate and editing these videos.
2. Once Nimbus capture is installed you’ll want to pin this to your browser header for quick access. Here you’ll find the logo within your browsers dashboard, to the right of the search bar on desktop.

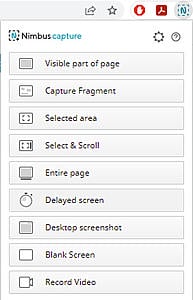
3. Clicking on this button opens a dropdown menu with a variety of different options. Many of these reference the options of capturing static content and images from your browser. We cover much of this within the post discussing how to take website screenshots. However the final option within the menu is titled record video and this is what we’ll be covering here in this guide with a focus on how to take a video in your browser.

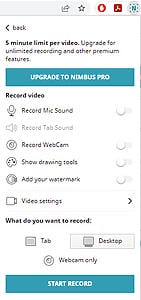
4. You’ll find that when you click on this record video button a new menu opens. Offering further options on the requirements for capturing your video screenshots through this plugin. These include recording mic sound which may be helpful for onscreen tutorials, as well as drawing tools, video settings and the option to record your entire desktop display. For example recording multiple screens or open tabs or simply the tab that’s currently open on your screen.

5. It’s worth playing around with these options to get used to the features available. The basic option to opt for would be selecting the tab option and then select the Start Recording button. You’ll notice that the pop up box will disappear and the Nimbus capture logo in your browser header will load a red dot signalling that your screen is being captured. Once you’ve finished capturing video screenshots of your website and ready to finish recording simply click on the red dot within the Nimbus capture plugin for the recording to finish.
6. A new tab will open with your video capture that you can playback, download or upload your screencast browser video.
Resources for Taking a Video in Your Browser
You’ve now captured your browser video screenshot. For editing options you’ll be required to upgrade to the paid option of Nimbus Pro for $3.50 per month. Allowing you to access these additional features. However if you just want to capture simple videos without annotations or cropping tools then the basic version of this will be more than sufficient for your needs.
We hope you’ve found this post helpful and have discovered how to take a video in your browser. You can find additional resources and guides on how to navigate the more complexed features of this plugin online. But the best way we recommend is through using the addon yourself and learning how to use it best to suit your needs and requirements.
Although we’ve focused predominantly on Nimbus Capture within this post there are many other similar tools for taking a video in your browser. So it’s worth investigating which suits your needs and that you most enjoy using. Particularly if you’ll be using this feature regularly for creating tutorials and online guides.
For further resources visit the Primal Space blog or sign up to our newsletter for new updates on services.
