How to Use Google Sheets for Project Management
Google sheets are an excellent tool, allowing us to collaborate on projects together with our clients. As well as showing progress on the completion of tasks. In this post we give a brief overview on how to use Google sheets for project management, successfully tracking a project. Including how to add comments and screenshots to the shared cloud document.
We find that using Google Sheets is an effective project management software. Providing a system to manage a website design project, for example, simply and effectively from start to finish. Giving everyone who has access to the shared sheet an opportunity to stay up to date and contribute to updates in real time. Minimising email chains, which can become ever more complex when there are several people collaborating on one single project.
What are Google Sheets?
Sheets are a cloud based spreadsheet accessed via your Google account and completely free! Allowing you to create collaborative task lists, project tracking and documents that can be accessed and worked on by multiple members of a team who are granted secure access.
Gone are the days of updating an excel document on your laptop them emailing it to others, only to find that it’s already an outdated version because someone else has done the same. Google sheets allows cloud based documents that can be updated in real time for all members. Giving teams the power to collaborate effectively and efficiently. While allowing you to choose from templates on a variety of topics. Or create your own customised template for your specific business or project.
How do we use Sheets?
As part of any new website development project, for both WordPress and Magento clients, we create a customised task list for project planning and tracking. Outlining every piece of work we’ll carry out as part of the project based on your own specific project requirements. While granting access to clients and their teams to allow them to collaborate, add comments and track progress.
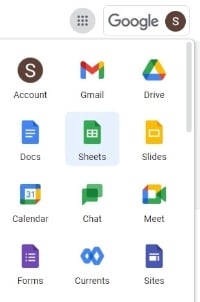
Sheets are a feature within your Google account, and can be accessed from your Google dashboard. Simply select sheets from your Google menu when logged into your dashboard. Here you’ll be able to access existing Google sheets or create new sheets.
Adding comments to Google Sheets
When embarking on a new project together, a feature you’ll use often within the Google sheet we provide you with is the add comment feature. Comments can be added to tasks in the comments section of the customised sheet.
To do this you’ll hover over the block within the spreadsheet that you wish to add the comment to. Right clicking will open a variety of options, the one you’ll select is the ‘comment’ option with the speech bubble icon, located towards the bottom of the pop out menu.
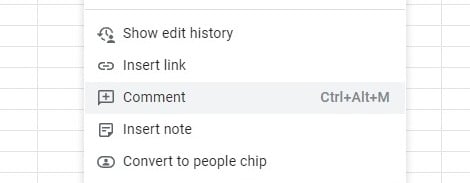
The box you’re looking to add a comment to will now appear a different colour. While showing a box where you can type your comment.
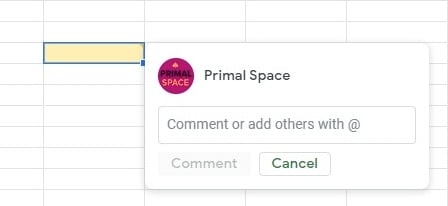
You can also tag others who you’d specifically like to direct the comments to. Ensuring they receive an instant email notification alerting them that they have a comment that needs actioned. Simply click on the ‘Comment’ button and your comment will be saved on the sheet. You can tick the box to action the comment, as well as edit or delete the comment as required.
Uploading Screenshots to a Google Sheet
Another feature you’re likely to use when updating your customised Google sheet is uploading screenshots. Firstly you’ll need to capture your screenshot, you can use this guide we’ve created on how to take website screenshots.
You’ll then need to upload the screenshot to your Google drive folder that’s been created for your website development project, there should already be a folder titled ‘website screenshots’.
The next step is to copy the URL link for the image as a comment to the cell you wish to share the screenshot to in your Google sheet. You can refer to the steps on how to add a comment provided earlier in this post for guidance.
Alternatively if you wish to add the image to the cell, you can select the cell location. Then choose insert > image option from the menu. Either inserting the image within the cell, or over the cell.
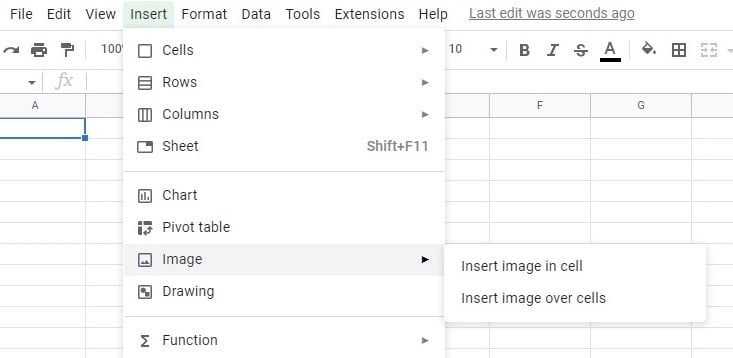
As before the image will need to be uploaded to your Google drive folder to allow you to add this to your Google Sheet.
Benefits of Google Sheets on a Project
We hope you’ve enjoyed learning how to use Google sheets and the benefits of these on a collaborative project. Not only allowing you to track your progress on a website design project, but also provide input in real time with all team members. Without the need for lengthy email threads and outdated excel spreadsheets.
There are many features of Google Sheets that can be utilised and explored. However we’ve just provided a few of the tools in this post. Particularly the ones that will be most beneficial when updating the sheets that we’ve created for you as part of your website design project. If there are any specific questions on how to perform specific functions then do reach out and we’ll update this post, allowing others to benefit from too. You can also find more in depth guides on how to use sheets on Googles own website.
If you’re not yet a Primal Space client, then reach out to us and provide your requirements to find out how we can support your business.
Enjoy this tutorial? Please feel free to share. You can find more helpful guides in the blog area of our website.


